Valto — Keep ahead of tomorrow

News

Everything You Need To Know About Creating A Gallery In Power Apps

Learn how to create and customise galleries in Power Apps with this step-by-step guide. Explore gallery types, key properties, and expert tips for building interactive, data-driven apps.

PowerApps
Published
20 January 2025
everything you need to know about creating a gallery in power apps

Everything You Need To Know About Creating A Gallery In Power Apps

A gallery in Power Apps is a flexible control that displays records from data sources like SharePoint or Dataverse.

It offers customisation options, allowing you to choose which data points to show and how they are arranged.

In this blog, we’ll guide you through creating a gallery, from connecting your data source to adding interactive features, helping you make the most of this powerful control in your apps.

What is a gallery?

A gallery is a very flexible control used to display a set of records from a data source, whether that’s defined in app using collections, or from connected data sources such as SharePoint & Dataverse.

Galleries are exclusive to canvas apps and come with the benefit of total customisation capabilities. You can choose which data points from a record to display and how those are arranged – with the caveat that each record in a specific gallery will follow the same design.

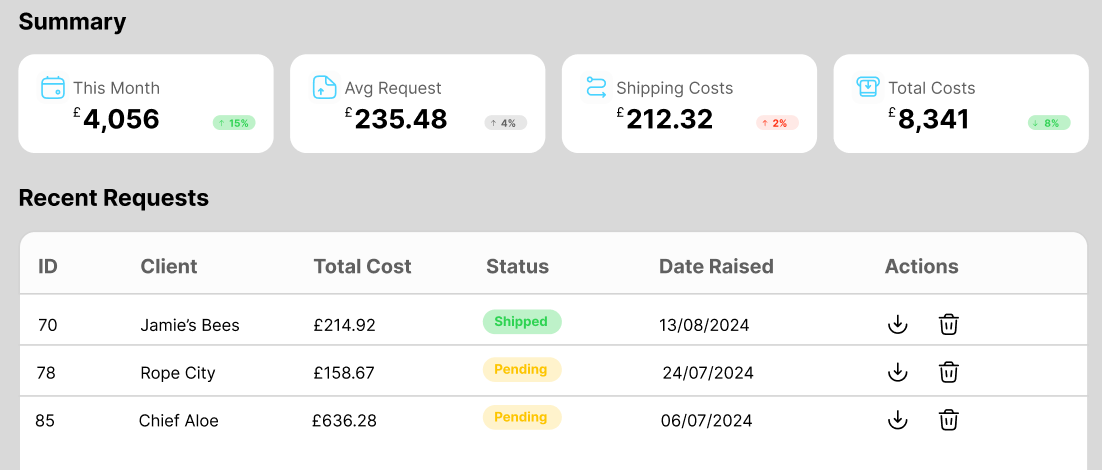
To highlight the variety, both the summary & recent transactions below could both be galleries. Summary would be a horizontal gallery and Recent requests a vertical gallery.

Variations

Galleries come in three forms. Vertical, Horizontal, and Flexible, though at the time of writing the flexible galleries are a little temperamental so most of your work will be with vertical or horizontal galleries.

The difference between vertical and horizontal is simply the direction that records stack. For vertical, they will be top to bottom. For horizontal, left to right.


First gallery pre-requisites

You will need a data source to connect to

  • In this example, I will be using SharePoint with some sample data, but you can use any that you have.
  • If you wish to follow this example

  • download the pet_data.xlsx (opens in a new tab) csv file
  • In your SharePoint site select New > List (Fig 1)
  • Select “from CSV” (Fig 2)
  • On the import screen select “Title” for the pet’s name and click next (Fig 3)
  • Click create on the confirmation popup
  • This will then import the list and make it available to you https://.sharepoint.com/sites//Lists/pet_data/
  • power apps gallery
    everything you need to know about creating a gallery in power apps

    Create your first Gallery

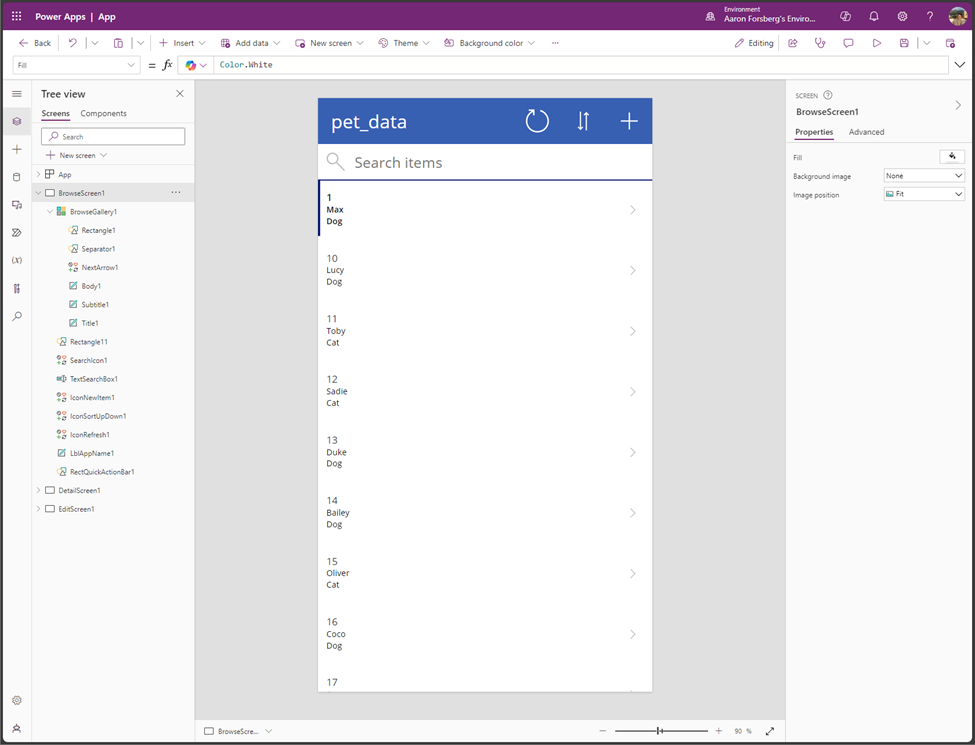
    Browse to https://make.powerapps.com/ Click “Start with an app template” > Click “From SharePoint” On the “Create an app” page select your sample site > select the "pet_data" list > click create This will create an app with three screens, one of which being focused on the gallery Your screen should now look like this. Step 1 Begin by selecting the topmost record in the gallery – handily marked by the blue rectangle – this will select the template in which we can edit. Step 2 Select “Title1” (the number 1 on screen or use the tree view on the left) and resize the width to 150 – just to give us more space. The other labels currently reference Title1 for their width & height also, so tackling the leading object will tackle the rest for us. This is great for consistency and can be done by referencing the control and its specific property – e.g. Title1.Height would take the height value and apply it to the current item, self-updating even when it changes. Step 3 With the gallery still selected, hit insert on the top ribbon and select “text label” Resize this new label as you like using the controls on the right-hand side and arrange it as you please. Step 4 Repeat until you are happy with the number of fields Arrange the fields as you like In the text property, use ThisItem.FieldName to determine which field from the data source is displayed. For fields with spaces use the following template for naming – ThisItem.’Field name’

    • Browse to https://make.powerapps.com/ Click “Start with an app template” > Click “From SharePoint”
    • On the “Create an app” page select your sample site > select the "pet_data" list > click create
    • This will create an app with three screens, one of which being focused on the gallery
    • Begin by selecting the topmost record in the gallery – handily marked by the blue rectangle – this will select the template in which we can edit.
    • With the gallery still selected, hit insert on the top ribbon and select “text label”
    create first power apps gallery

    Key points

    Items – This is our data source. Here we can define the filtering and sorting of the data source too. It can be as simple as the data source’s name, or some added complexity like in the pre-created example Template size – the design space for each record – akin to a container. This property only defines the height. The width is determined either by gallery width. If you select the topmost record of the gallery, you will see the template highlighted. In here you can add or remove data points Wrap count – the number of items in a row. For Vertical galleries, this determines the number of records in a row, for horizontal it will determine the number of records in a column. Default – determines the initially selected item OnSelect – defines the behaviour that occurs when a record is selected in gallery. It could be navigate, it could be to update a variable.

    • Default – determines the initially selected item
    • OnSelect – defines the behaviour that occurs when a record is selected in gallery. It could be navigate, it could be to update a variable.

    Making galleries interactive

    With the above example, although this is a functional gallery, an extra tip is to include buttons.

  • Select the template, hit insert, and insert a button
  • On the button, remove the Text from the Text property
  • resize the button to fill the entire template
  • set the fill property to RGBA(0,0,0,0)
  • Set the HoverFill property to RGBA(244,244,244,0.5) – the important number is the last (0.5) as it denotes the opacity of the colour, the first three could be whatever you want.
  • Set the OnSelect to Navigate(DetailScreen1, ScreenTransition.None)
  • Now the gallery will react to the cursor, indicating that the item is clickable. Not only does it light up grey, but the cursor will also change to indicate that it can be selected.

    Next Steps

    You have now successfully created a gallery from a template, added additional fields and added some custom UI functionality to enhance the experience. To continue your journey, try out the following:

  • Add in different field types, choices, people, etc.
  • Play with the UI
  • Practice setting variables using the OnSelect function
  • Practice changing the UI based on whether the item is selected or not
  • Pair the gallery with other controls such as a form – when an item is selected, show it in the form for example.
  • Try out the Filter() and Sort() functions
  • Trusted by Leading Brands

    “We work with organisations across many sectors of different shapes and sizes from 10 to 100,000 employees.”

    Contact Form

    Contact our team today!

    Talk to our team

    Contact Us

    Topics
    Share this

    Related reading

    NewsMicrosoft 365

    Dynamics 365 vs Model Driven Power Apps

    Explore how SMEs can use Microsoft Model-Driven Apps to create affordable, custom CRM-like systems. Learn how to manage customer data, track sales, automate tasks, and access powerful reporting—without the high cost of Dynamics 365.

    22 January 2025

    NewsPowerApps

    Power Apps vs. Power Automate

    Explore the differences between Power Apps and Power Automate and learn how combining them can deliver powerful, low-code solutions for businesses. Discover how these tools work together to streamline processes and improve efficiency.

    21 January 2025

    NewsPowerApps

    Using The UpdateContext Function In Power Apps

    Discover how to efficiently use the UpdateContext function in Power Apps to manage context variables, optimise memory usage, and enhance app performance. Learn best practices and practical examples for Canvas Apps.

    21 January 2025