Valto — Keep ahead of tomorrow

News

Everything you need to know about creating forms in Power Apps

Learn how to create forms in Power Apps Canvas apps with this step-by-step guide by Jay Wellings. Discover the key components, best practices, and tips for connecting to data sources like SharePoint, Excel, and Dataverse.

PowerApps
Published
2 October 2024
everything you need to know about creating forms in power apps

Everything you need to know about creating forms in Power Apps

It’s always good to set your stall out early – and lets get the awkward part out of the way first – PowerApps is a bit of an overloaded term as this encompasses Canvas apps, Model Driven Apps and Power Pages which can at time get confusing – as such for the purposes of this article we are going to be focusing on Forms in Canvas Apps.

The general principles should stand for whichever flavour of PowerApp you are using, but your implementation will most likely differ.

Introduction

PowerApps Canvas apps are akin to a blank sheet of paper within the Power Platform. As the developer, you (mostly) have complete control over the user interface, user experience, and business logic.

You can interact with many different data sources and APIs, build apps that are responsive and even introduce bugs if you’re really good! As such providing a comprehensive set of tools to create solutions quickly and efficiently, leveraging low-code benefits for rapid application development.

So, What is a Form?

A form is a user interface component that has been a core aspect of software design long before the internet age.

According to Wikipedia, its described as: “The user interacts with the application by selecting one of a number of possible values, and by entering text into the fields that accept it.”

In practise a form is a container that hold elements that a user interacts with some Canvas App examples being:

Text Input: For entering single-line text.
Text Box: For entering multi-line text.
Dropdown: For selecting one option from a list.
Combo Box: For selecting one or multiple options with a search capability.
Date Picker: For selecting a date from a calendar view.
Toggle: For switching between two states (e.g., on/off).
Slider: For selecting a value within a range.
Radio Button: For selecting one option from a set.
Checkbox: For selecting multiple options independently.
Button: For submitting or performing actions.
Label: For displaying static text or dynamic data.


campaign analysis

Why should I use a Form?

Simply put two action – user interaction and data input, – these 2 things are the glue that holds the majority of day to day applications together.

How to create my first form?

Pre-requisites

You will require a Datasource to connect to.

  • In this example I will be using a SharePoint List with some sample data , but you can use any data source you have such as an Excel document, Dataverse or SQL database.If you wish to follow with the example:
  • Download the pet_data.xlsx csv file
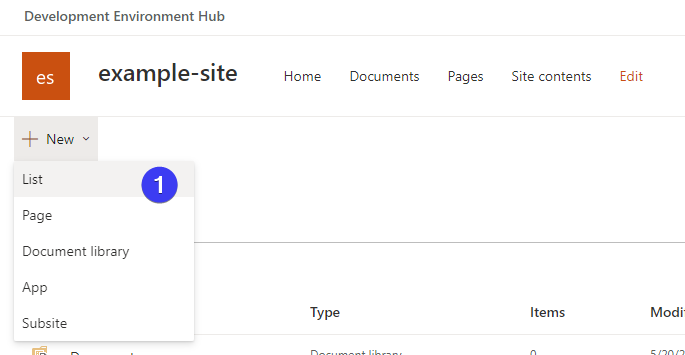
  • In your SharePoint site select New > List (Fig 1)
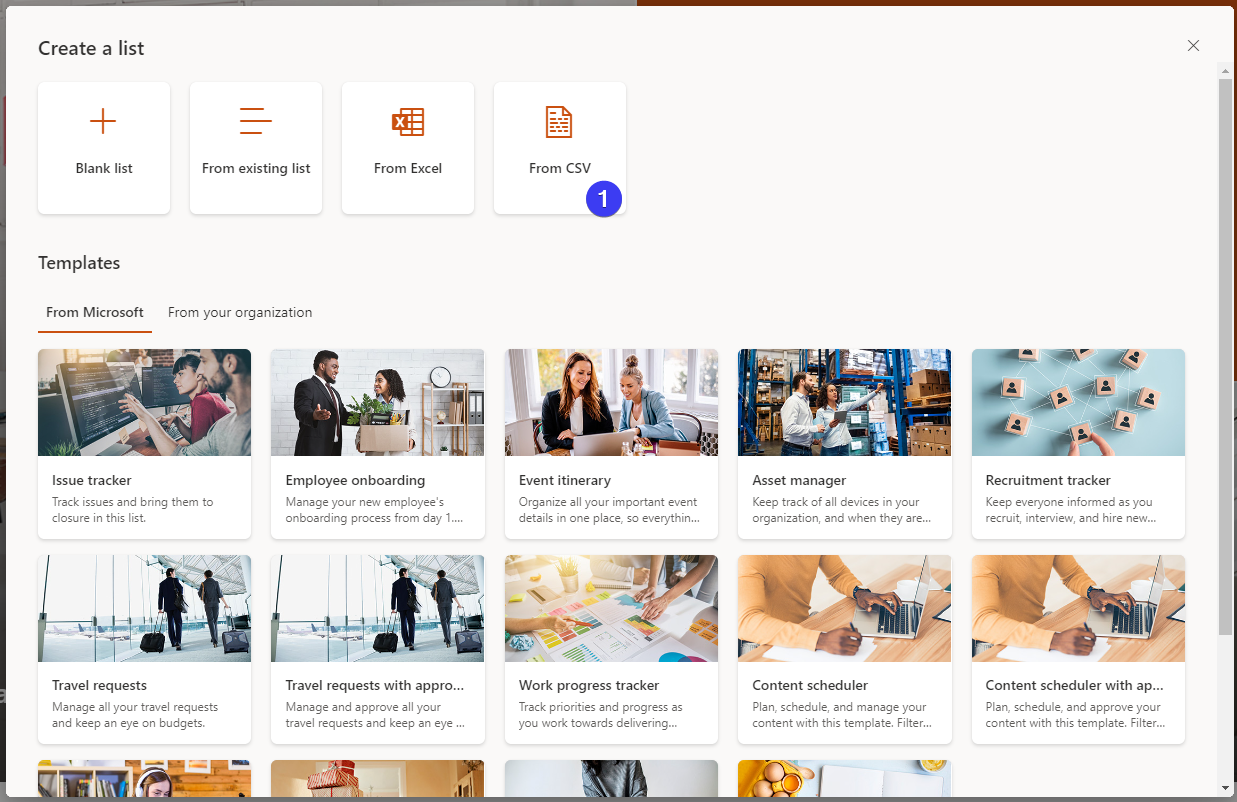
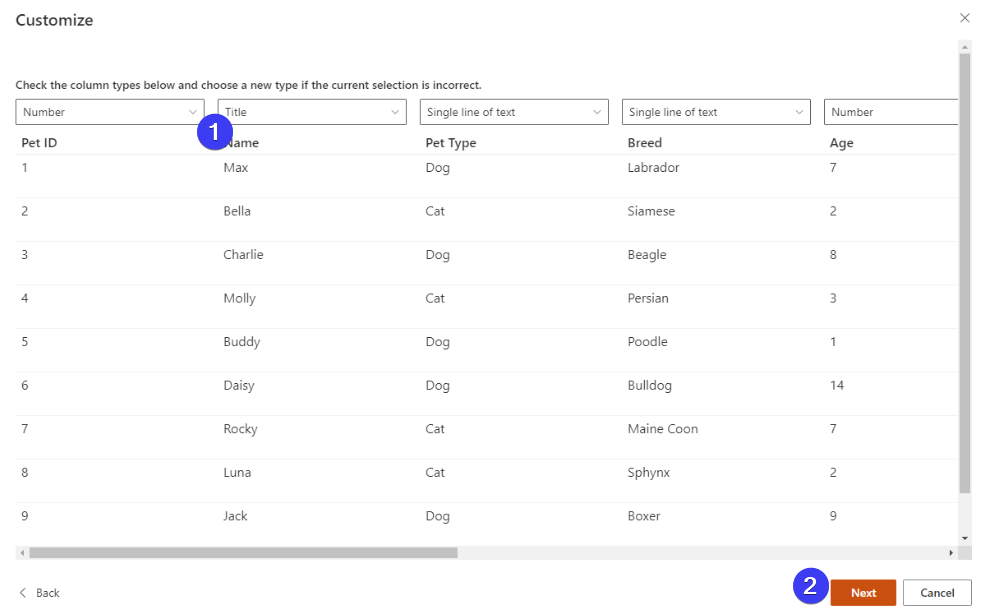
  • Select “from CSV” (Fig 2) On the import screen select “Title” for the pet name and click next (Fig 3)
  • Click create on the confirmation popup
  • This will then import the list and make it available to you https://.sharepoint.com/sites//Lists/pet_data/
how to create a form
everything you need to know about creating forms in power apps

Create your first form

Browse to https://make.powerapps.com/ Click “Start with an app template” > Click “From SharePoint” On the “Create an app” page select your sample site > select the "pet_data" list > click create (fig 4) This will create a 3 page Canvas App. In here, you have two examples of forms - these can be seen in the image below: Step 1 - This is the gallery view of the pet data. This component will launch you into the forms to view each record details. The on the “OnSelect” action of the this component will navigate you to the “DetailsScreen1”- described in step 2. Step 2 - We have an example of a “Detail Form” this displays the fields from the selected record in a read-only form. These types are forms are used to easily display data in an none editable way. The key properties to understand are: Data source - This identifies where the data shown in the form, in our case this is configured to use the "pet_data" from SharePoint (Step 4). Item - This points to the selected record from the gallery so the form knows which record to display to the user (Under the advanced tab). Fields - These are the fields shown on the form - you can modify what is used on the form by clicking “edit fields” - here you have the option to Add, remove and reorder the fields on the form (Step 5). Layout options & Style options - there are options quickly modify the layout of the form (Step 6) and Step 8 gives you the options to alter the background colour, form size, position and add border colours and thickness.Step 3 - This is an example of “Edit Form” that based on how this is set up will allow you to either edit existing data in a Datasource or add new records to the Datasource. The properties that are outlined above also apply to the “Edit Form” However the "Edit Form" has a unique value called “Default Mode” this has the options: Edit - This vis to be used when the form is used to modify existing data New - This is to be used when the form is adding new data to your data source. View - This is used to switch the form into a read only mode.The default mode is a property that can be modified on the fly dependent on you use case. A good example of this would be: The user needs to add a new record > set form “new” mode. As the user submits the form switch the form to read only to prevent modification of form during save > set form “View” mode Once the data has been saved, reload the data into the app and allow the data to be editable > set the form to “Edit” mode All of the above covers 3 different use cases all while using the same form!To persist the data from an editable or new form you need to implement the SubmitForm function in the OnSelect property of a Button control. In our example this is the “tick” icon to the left for step 4.

  • Browse to https://make.powerapps.com/
  • Click “Start with an app template” > Click “From SharePoint”
  • On the “Create an app” page select your sample site > select the "pet_data" list > click create (fig 4)
  • Data source - This identifies where the data shown in the form, in our case this is configured to use the "pet_data" from SharePoint (Step 4).
  • Item - This points to the selected record from the gallery so the form knows which record to display to the user (Under the advanced tab).

Our Experts Opinion

Now that you have a foundational understanding of creating forms in Power Apps Canvas apps here are some next steps to help you continue your learning journey:

  • Try connecting your forms to different data sources such as Excel, Dataverse, or SQL databases.
  • Experiment with different styles, colors, and formats to match your app’s branding and user experience needs.
  • Implement advanced business logic and validation rules to enhance data integrity and user experience.
  • Practice using form functions such as ResetForm, and Patch to manage form submissions and updates.
  • Investigate how to integrate your Canvas apps with Power Automate to automate workflows triggered by form submissions- Jay Wellings, Head of Development

    Trusted by Leading Brands

    “We work with organisations across many sectors of different shapes and sizes from 10 to 100,000 employees.”

    Contact Form

    Contact our team today!

  • how to create a form

    Frequently asked questions

    PowerApps includes Canvas apps, Model-Driven apps, and Power Pages. For creating forms with complete control over the user interface and design, Canvas apps are the best option. This blog focuses on Canvas apps and how to create forms within them for user interaction and data input.
    A form in Power Apps is a user interface component that allows users to interact with and input data into an application. Forms are essential for collecting data, displaying records, and enabling users to edit or submit information. They are crucial for building applications that require user input, making them a key part of any business app.
    To connect a form to a data source such as SharePoint, first ensure you have a SharePoint list ready. Then, within Power Apps, use the "Create an app" feature, choose "From SharePoint," and select your data source. This process will automatically generate a Canvas app with forms tied to your SharePoint data.
    Power Apps provides a wide variety of form controls, including Text Input, Dropdown, Combo Box, Date Picker, Toggle, Slider, Radio Button, Checkbox, Button, and Label. These controls allow users to input and interact with data in various ways, giving you flexibility in how you design your forms.
    To customize a form’s layout, you can modify the form's properties such as the number of columns, field arrangement, and overall size. You can also adjust the style by changing the background color, border thickness, and font settings to match your branding. These options are accessible under the "Layout" and "Style" tabs within the form control settings.
    To submit data from a form in Power Apps, you need to add a button with the SubmitForm function. This function allows the form to send the user’s input back to the connected data source (such as SharePoint, Excel, or Dataverse). The OnSelect property of the button should contain the SubmitForm function to trigger the data submission process.

    Talk to our team

    Contact Us

    Topics
    Share this

    Related reading

    NewsMicrosoft 365

    Dynamics 365 vs Model Driven Power Apps

    Explore how SMEs can use Microsoft Model-Driven Apps to create affordable, custom CRM-like systems. Learn how to manage customer data, track sales, automate tasks, and access powerful reporting—without the high cost of Dynamics 365.

    22 January 2025

    NewsPowerApps

    Power Apps vs. Power Automate

    Explore the differences between Power Apps and Power Automate and learn how combining them can deliver powerful, low-code solutions for businesses. Discover how these tools work together to streamline processes and improve efficiency.

    21 January 2025

    NewsPowerApps

    Using The UpdateContext Function In Power Apps

    Discover how to efficiently use the UpdateContext function in Power Apps to manage context variables, optimise memory usage, and enhance app performance. Learn best practices and practical examples for Canvas Apps.

    21 January 2025